Quick Start Guide
New Collaboration rooms give all attendees an inclusive and collaborative experience. The technology allows participants with a laptop to screen share and present with ease. Choose a topic below to get started:
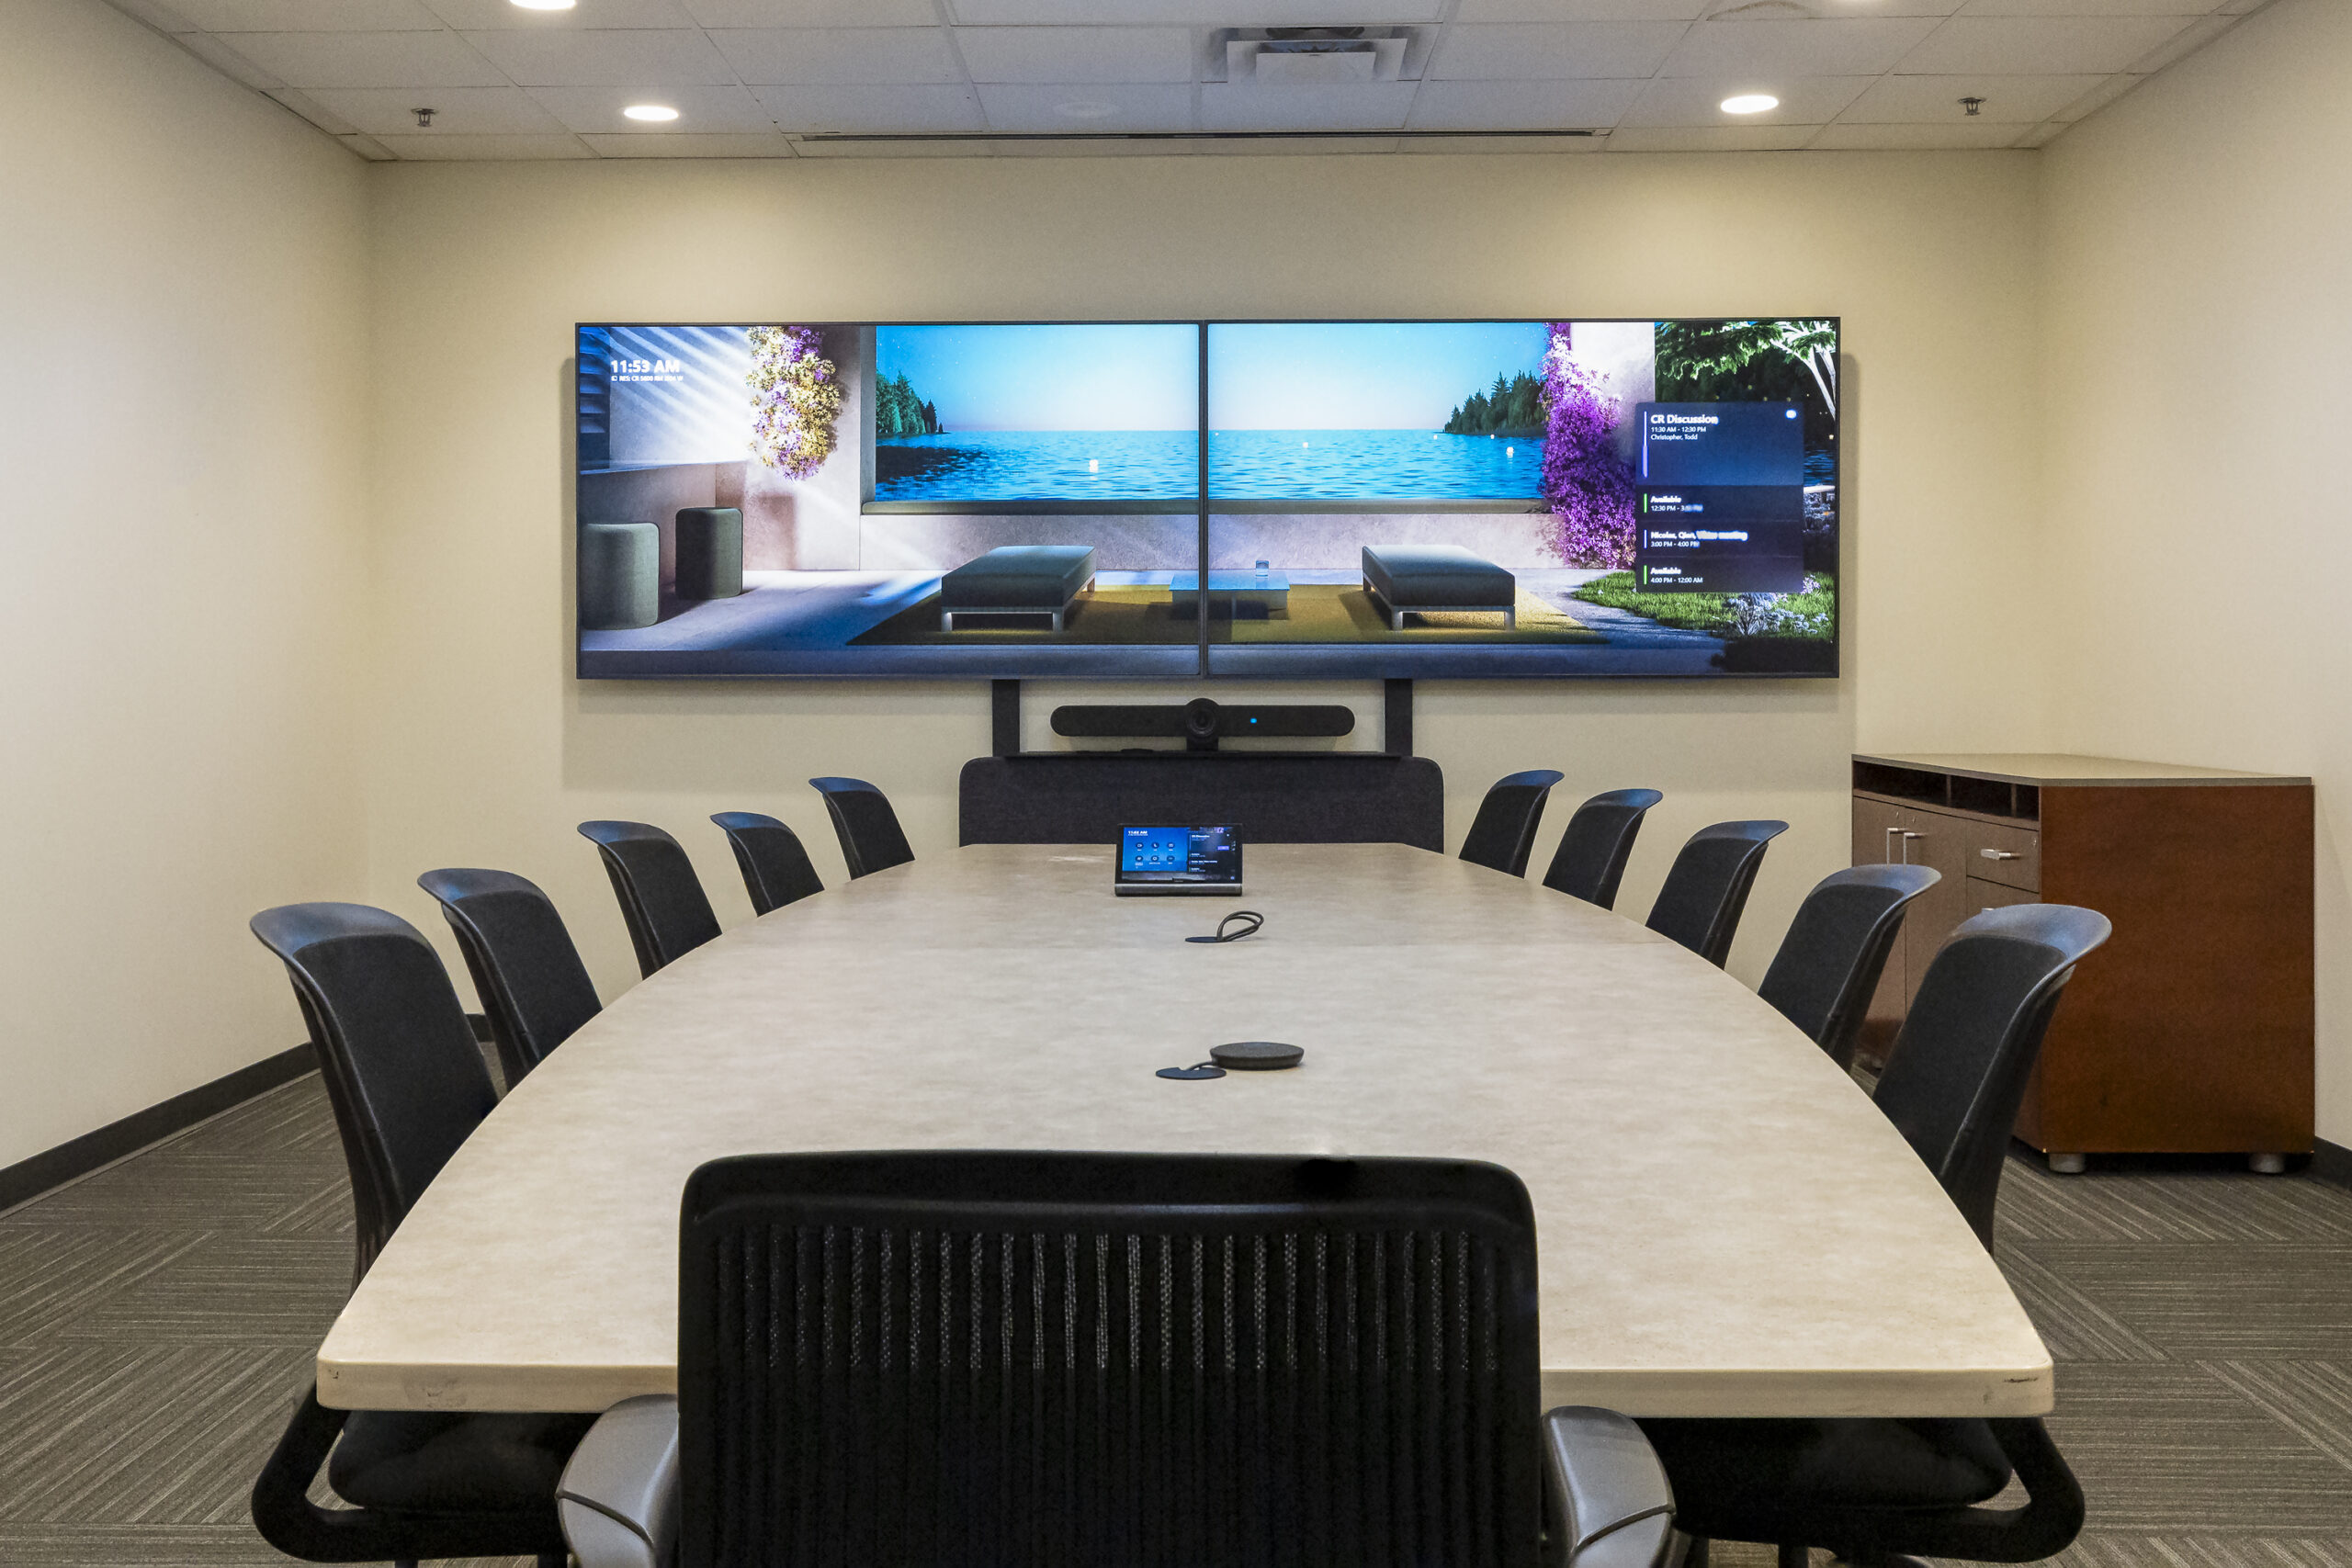
Learn about the touchscreen console
The touchscreen console is the heart of every meeting. It wakes up when it detects motion.
On the screen, you can:
- Join a scheduled meeting by selecting the meeting and clicking the Join button.
- Start a new meeting by selecting Meet.
- Screenshare from your laptop just as you normally would in Teams.
When you’re in a meeting, you’ll have options to manage your camera and mic, share content, add participants, and end the call.
NOTE: For a meeting to show up on the room console, the host must set the room as the meeting location in Outlook and have received an auto-accept email when scheduling. Console is only compatible with Teams, Zoom, Webex, and Blue Jeans meeting.
Use Outlook to reserve a room
- Open Outlook calendar
- Select New Meeting
- Make sure Teams Meeting is toggled on in the location box in the New Meeting window.
- Teams meetings are selected by default at ORNL
- Select Room Finder in the meeting scheduler
- May also add the conference room email as a required attendee
- Select Show a room list and find a building or list
- Choose a room from the list of available rooms
- Complete the meeting invitation as usual and send
For detailed instructions and examples of how to locate a specific room, see Knowledge Base article KB0011681.
Use Outlook to add a room to an existing meeting
- Open the meeting in Outlook.
- Add the room name found on the console in the To field or find the room using Room Finder in the meeting scheduler, and send the update.
- If the meeting is accepted, it will appear on the console.
- Select the meeting on the console to join.
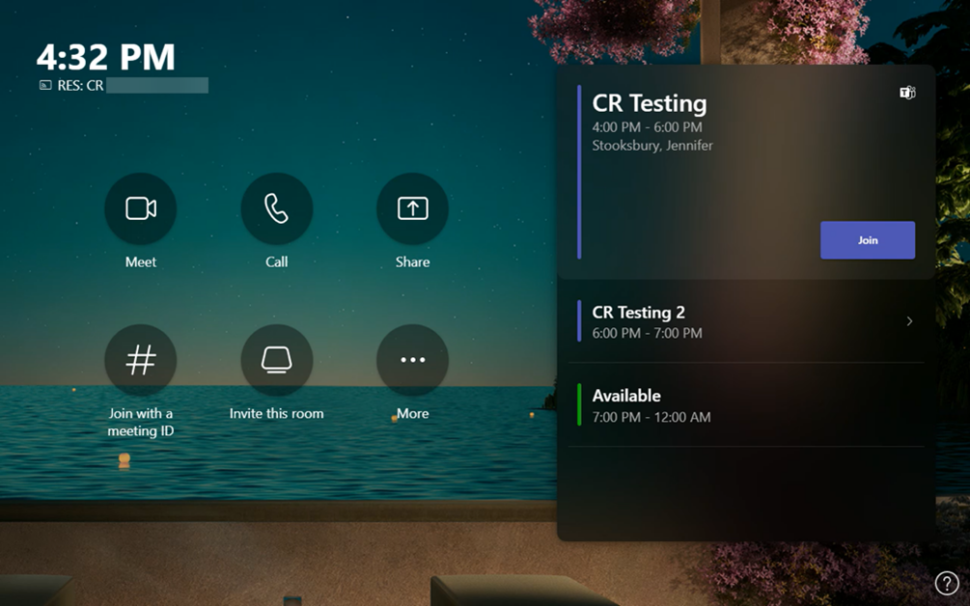
Join a scheduled meeting
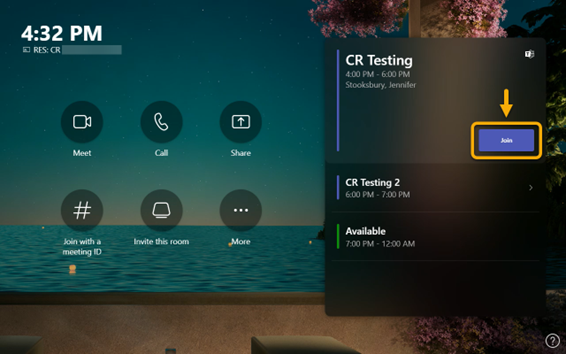
Find your meeting on the touchscreen console with the “Join” button; select it to automatically join the meeting.
If a scheduled meeting appearing on the console doesn’t have a “Join” button:
- Confirm the meeting has been set up as a Teams meeting
- Have a participant in the meeting add the conference room as a participant
- When the console rings; select Accept on the console
- NOTE: Make sure to select “DON’T USE AUDIO” in the pre-join options.
Start a new meeting

- Select Meet on the console
- Find the person you want to invite under Invite someone or dial a number
- Select the person to add them to the meeting
- After the person is selected, select Request to Join, and the meeting will begin automatically
Share screen from a laptop or tablet
There are two ways to share with both in-room and online participants:
- Join the meeting on your device and select share your screen with in-room participants
- This method will provide the same experience as a normal Teams meeting and can be accomplished wirelessly.
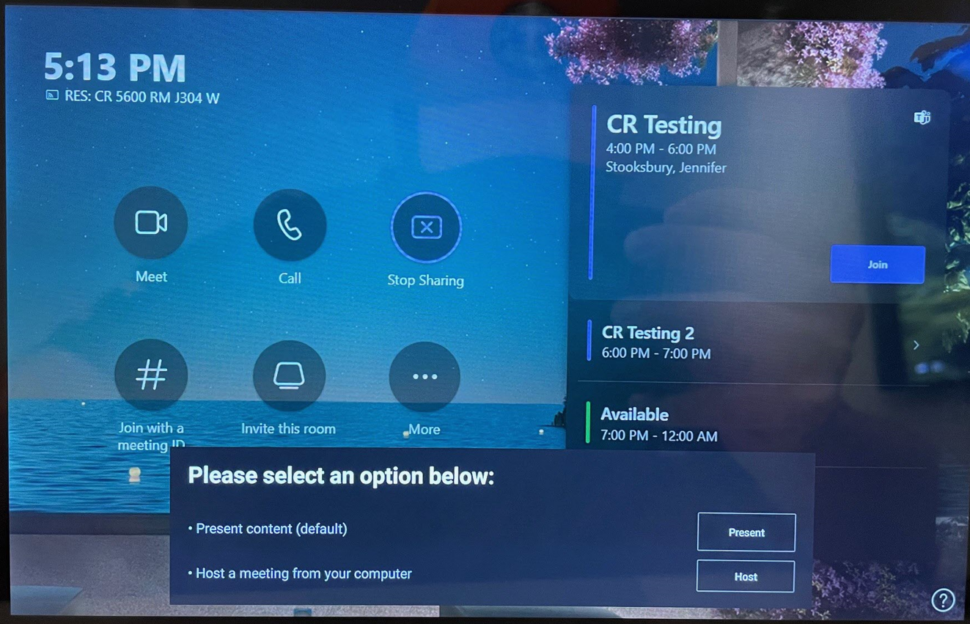
- Connect your device to the video USB-C cable (labeled SHARE) connected to the room console
When connecting via USB-C cable, the room console will present you with two options. If you do not make a selection, it will default to the first:
- Present content (default)
- Shares your screen only to the display in the room, therefore only visible to the in-room participants
- Host a meeting from your computer
- Take over the camera, audio, and displays in the room. This option will make your content visible to both in-room and virtual attendees.
Share in-room whiteboard content
- Select the Share icon on the console, and the whiteboard will appear to all participants in the Teams meeting
- While you write, the board content will be enhanced for hybrid participants
Manage a meeting
Add a participant
- Go to invite someone or dial a number and enter the person you want to invite
- Select the person to add or enter a phone number, and add them to the list of invitees
- After the person you want to invite is chosen, select Request to Join
Pin participant video
When there are multiple people with video on in a meeting, select a person’s name on the console to and select Pin to spotlight their video.
Note: This will only pin the video for the conference room, not for virtual participants.
Manage audio
- Select Mic on the room console to mute or unmute the room mic
- Select to adjust the speaker volume or mute the speaker
- Mute participants from the participants list pane, select a name, and then select Mute participant
Manage video
- While in a meeting, select Camera on the room console to turn the room camera on and off
- Select the three-button ellipse to select other options, such as live captions, chat bubbles, and to turn off incoming video.
Join a Zoom, Webex, or Blue Jeans meeting
There are two ways to join a supported third party meeting:
- Add the room as a participant (standard join):
- Exchange will pull the meeting information from the calendar entry and recognize if it is a Zoom, Webex, or Blue Jeans meeting.
- The icon on the console screen will change to show the meeting type in the upper right corner
- Click Join and it will connect the room to the meeting
- Note: You will not be able to change any meeting settings from the console if you join in this way. To control what is being shared, adjust settings, or add participants, join your laptop to the meeting.
- Join via laptop:
- Locate the display cable (marked SHARE) on the table near the console, and connect it to your laptop
- Follow the prompts on the touch panel and select Host a meeting from your computer
- Join your Zoom, Webex, or Blue Jeans meeting and add the room audio/mic and camera to your online meeting application settings.